Wall caps are an essential finishing touch for stone, brick, and concrete walls, providing both aesthetic appeal and structural protection. These caps act as a barrier against moisture, erosion, and general wear while enhancing the visual appeal of retaining walls, garden walls, and parapet structures.
If you’re looking to add durability and elegance to your outdoor walls, this step-by-step guide will walk you through how to install wall caps properly in 2026. From selecting the right materials to securing and sealing the caps, we’ll cover everything you need to know for a flawless installation.
Why Installing Wall Caps Is Important
Adding wall caps to your structure is more than just an aesthetic choice—it also serves as a crucial protective measure.

The Benefits of Wall Caps
Wall caps provide several benefits that enhance both the durability and appearance of a structure, including:
- Protection Against Water Damage – Wall caps prevent rainwater from seeping into the wall, reducing erosion and extending its lifespan.
- Enhanced Aesthetics – They add a polished and finished look to your walls, improving curb appeal.
- Structural Integrity – By covering the exposed edges of walls, wall caps help prevent chipping, cracking, and other forms of damage.
- Increased Property Value – A well-maintained and finished wall adds value to your landscape and home.
Common Applications for Wall Caps
Wall caps are used in a variety of outdoor and architectural applications, including:
- Retaining walls – Preventing soil erosion while adding an elegant touch.
- Garden walls – Creating a stylish edge to landscaped areas.
- Parapet walls – Protecting the tops of exterior building walls from the elements.
- Seating walls – Providing a comfortable and stylish seating option in patios or parks.
Now that you understand the importance of wall caps, let’s move on to how to install them properly.
Preparing for Wall Cap Installation
Proper preparation ensures a smooth installation and long-lasting results.
Choosing the Right Wall Caps for Your Project
Before installing wall caps, you’ll need to select the appropriate material. Common options include:
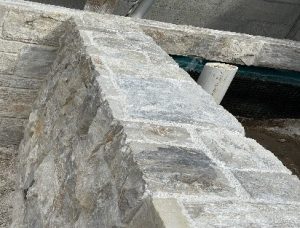
- Natural Stone Wall Caps – Durable and elegant, these offer a timeless look.
- Concrete Wall Caps – A cost-effective choice, available in various finishes and colors.
- Brick Wall Caps – Ideal for complementing brick walls while adding weather resistance.
For a high-end, natural aesthetic, Lompoc Stone provides premium-quality natural stone wall caps that blend seamlessly with different exterior wall styles.
Gathering the Necessary Tools and Materials
To install wall caps, you’ll need the following materials and tools:
- Wall caps (natural stone, concrete, or brick)
- Masonry adhesive or mortar mix
- Trowel and pointing tool
- Level and measuring tape
- Chalk line for alignment
- Rubber mallet
- Caulking gun (for adhesive applications)
Having the right tools ensures a precise and professional installation.
Step-by-Step Guide to Installing Wall Caps
Proper installation of wall caps involves careful placement, secure bonding, and sealing to ensure longevity.

Measuring and Aligning the Wall Caps
Start by measuring the width of your wall to ensure the caps fit properly. If needed, use a masonry saw to trim the wall caps for a perfect fit.
Mark a centerline on your wall using a chalk line to ensure that the caps are evenly aligned. This step prevents uneven gaps and ensures a straight, professional-looking installation.
Applying Adhesive or Mortar
Depending on your chosen material, you can secure wall caps using either masonry adhesive or mortar:
- Masonry adhesive – A strong and quick-drying option ideal for concrete and stone wall caps. Apply adhesive in thick beads along the top of the wall.
- Mortar mix – Used for a more permanent bond, especially with brick or stone caps. Spread a uniform layer of mortar with a trowel before setting each cap in place.
Both methods provide secure adhesion, preventing shifting over time.
Securing and Sealing the Wall Caps
After placing the wall caps, it’s crucial to ensure they are properly secured and finished.
Leveling and Adjusting the Caps
Once the caps are in place, use a rubber mallet to gently tap them down, ensuring a firm bond with the adhesive or mortar. Check with a level to maintain a smooth and even surface.
Make necessary adjustments before the adhesive or mortar sets, as this will prevent future maintenance issues.
Sealing for Long-Term Protection
Applying a sealant to natural stone or concrete wall caps helps protect against moisture, stains, and weather-related damage. A breathable, high-quality stone sealer from Lompoc Stone will keep your caps looking great for years.
Alternative Installation Techniques for Wall Caps
Depending on your project, different installation techniques may be more suitable.

Dry-Laid vs. Wet-Laid Installation
- Dry-Laid Method – Uses adhesive rather than mortar, offering flexibility for future adjustments.
- Wet-Laid Method – Involves setting the caps in mortar for a stronger, more permanent bond.
Both methods have advantages, with the wet-laid method being preferred for areas exposed to heavy weather conditions.
Customizing Wall Caps for Unique Designs
For a personalized touch, you can:
- Mix different materials like stone and brick.
- Use decorative edges or textures for a more refined look.
- Incorporate lighting elements into the wall cap design.
Customizing your wall caps enhances the overall aesthetic and functionality of your walls.
To complement retaining walls, learn how to arrange landscape boulders for natural balance.
FAQs
1. How long does it take to install wall caps?
Installation time varies based on wall length and material but typically takes a few hours to a full day.
2. Do I need to seal natural stone wall caps?
Yes, sealing helps protect against moisture, stains, and weather damage, extending the lifespan of your wall caps.
3. What is the best adhesive for wall caps?
Masonry adhesive works well for quick installation, while mortar provides a stronger, more permanent bond.
4. Can I install wall caps myself, or do I need a professional?
With the right tools and preparation, DIY installation is possible. However, hiring a professional ensures a flawless finish.
5. Where can I buy high-quality natural stone wall caps?
Visit Lompoc Stone for a premium selection of durable and stylish wall caps.
Conclusion
Installing wall caps is an excellent way to protect and enhance the look of your outdoor walls. By carefully selecting the right materials, following precise installation steps, and properly sealing the caps, you can achieve a durable and visually appealing finish.
At Lompoc Stone, we offer top-quality natural stone wall caps designed for beauty and longevity. Contact us today to explore our selection and elevate your outdoor space with timeless elegance!